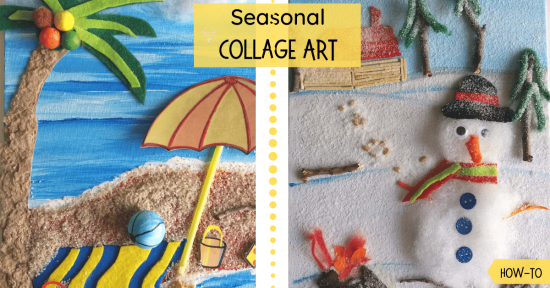
Celebrate the change of seasons by making a cute seasonal art collage. This project is great for kids of all ages and creative abilities since it could be open-ended using our basic tips!

I love using textures and different materials in our art lessons and always look for a variety of interesting objects to use in a collage. You can start the art lesson by defining the word “texture”. Explore the house and garden by touching various surfaces and objects.

Specific list of items are not mentioned for what is needed for the Seasonal Collage as you can let your imagination run wild and use a wide variety of materials and interesting objects. I will give a list of basics and explain a few techniques. (I also did not take as many process photos as I would’ve liked as we did most of the project during a 10 hour power outage.)
Basic items needed for the Winter collage:
- A4 Canvas panel
- Wood glue
- Table Salt
- Water colour paint
- Hairspray (aerosol can)
- Carbon Paper
- Fabric stuffing
- Materials of your choice to create trees, buttons, house, fire
What to do:

Draw your picture on a normal A4 paper. Decide on composition, what would you like to include in your winter scene? Next, use carbon paper and lightly copy your picture onto the canvas board. Paint the background with watercolour paint, use different shades of blue and grey. Paint the sky a darker shade of blue and use very light shades for the snow. While the paint is still wet, sprinkle a layer of salt onto the painting and let dry. The salt gives an amazing “snowy” effect.
Once the background is dry you can construct your house. We used normal match sticks for the house and red craft sticks for the roof. Paint the area where your house is going to be with a thin layer of wood glue and place the sticks. Paint the area for the snowman with a layer of wood glue and use stuffing to create a fluffy snowman. While the snowman is drying you can work on the rest of your picture.

Use small dried branches for the trees or use cardboard with an interesting texture. You can use paper, real pine needles or green pipe cleaners for the leaves. We used small pieces of bark for the fire with bits and coloured paper in between.
Finish your snowman by adding buttons, a hat, scarf and eyes and a nose. Our snowman has pieces of coloured felt for his hat and scarf.
Once your picture is complete and dry, spray a layer of hairspray. While the hairspray is wet, sprinkle with salt again to give the impression of falling snowflakes.

Basic items needed for the Summer collage:
- A4 Canvas Panel
- Wood glue
- Water colour paint
- Carbon paper
- Sand
- Fabric, coloured paper, pom poms, interesting bits and pieces.
What to do:

As with the winter scene, draw your picture on an A4 sheet and transfer to your canvas using the carbon paper. Start by painting the sky and sea, using different shades of blue. Use a thick layer of white paint to create foamy waves then paint the sand area in a medium shade of brown.
Construct the palm tree – trace your palm tree trunk onto a sturdy piece of cardboard. We used small pieces of recycled cardboard and glued it onto the trunk to give a rough texture. Trace the leaves onto a piece of green felt. Use chalk to trace on the back of your original drawing and press down firmly onto the felt to show the lines. Cut out the leaves and add a lighter shade of green on on top of the leaves if so desired. Once the trunk is dry, cut out and glue the leaves and nuts.

Trace the umbrella on a sturdy piece of cardboard and use different coloured paper to construct. (Coloured tracing paper was used here.) Cut buckets out of coloured cardboard. Fold a small piece of cardboard in a concertina shape and glue to the back of the buckets and umbrella. This will give your objects a bit of “lift” for a three dimensional effect.

We painted a polystyrene ball for the beachball and used coloured felt for the beach towel. Once all the pieces are assembled, you can complete the picture.
Glue all the objects in place. Paint a coat of wood glue on the sand area and sprinkle with a layer of sand. (Dala Course Art Sand was used here but any clean, dry sand should do.) Lastly, you can add finishing touches by using fabric stuffing, or cotton wool, to create a few fluffy clouds and a pebble or two in the rock pool.

Such a fun seasonal collage art project when you have lots of time on your hands and the creative possibilities are endless!


Leave a Reply
You must be logged in to post a comment.