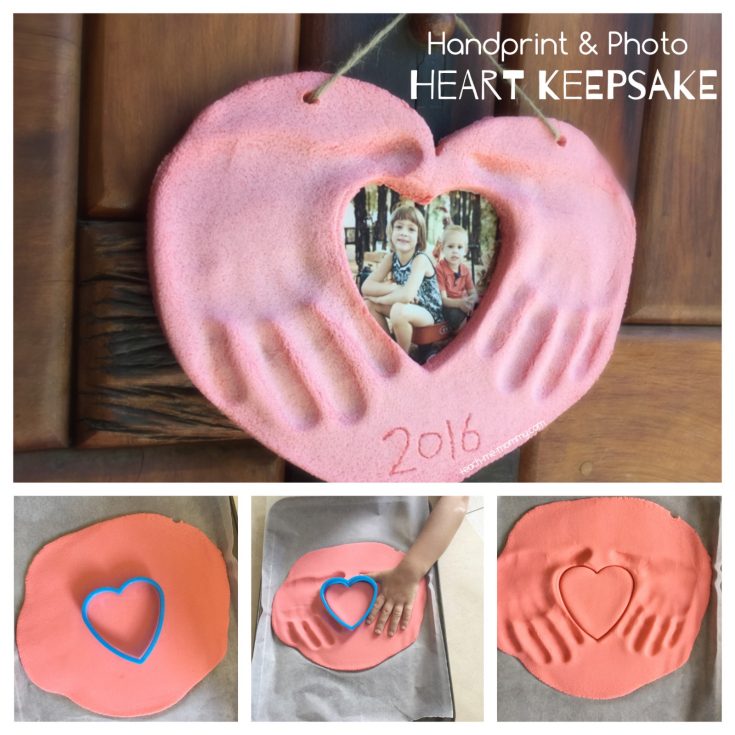
I have THE cutest keepsake idea for you today: Hands & Photo Heart Keepsake made from salt dough!

After this Handprint & Photo Keepsake Ornament went viral last time, I’ve been dreaming(literally) about creating something similar but with a love theme(for Valentine’s Day, but also as an extra special keepsake). I *think* this one qualifies, what do you think?
PS: see our latest keepsake gift: Fingerprint Heart Garland Photo Frame!
Here is how we did it, or print the instructions card below if you wish:
You need (plain or cake)flour, salt, water and food colouring(if you want it coloured, plain is also nice though). I used a cup of flour plus a cup of salt together with a half cup of coloured water. (Originally I wanted it red, but it came out pinkish because it does get lighter when dry, but I love the colour!)
Simply mix the ingredients until it is dough-like. If too sticky add more flour and salt(equal amounts), if too grainy, add more flour, but not too much, it should be a little rough looking.
Roll it out on a baking sheet, covered with wax paper, about 1cm in thickness. Use a biggish heart cookie cutter for the photo part. It should be big enough to fit a reasonably sized photo, but not too big so that your kids’ hands won’t go around (or almost).
Press the heart first, then add the hands. I added a hand of both my kids, but one can do both hands of one kid too.
Then I removed the heart cut-out carefully. The date was added with a sharp tool(this was before I had my cookie stamps, see below) and two holes were made to hang it up with a string.
The keepsake was baked for 3 hours at 80’C(160 F). I turned it around and let it lie overnight in the switched off oven(cooling down) and drying the back side properly. (It can air-dry, but it will take a week, at least.)
I added a photo to cardboard, measured so it will fit nicely in the open space. This was stuck to the back with glue. A strong string was threaded through the holes and secured tightly at the back. Note: this keepsake is quite heavy and is breakable.
I did see with another project that damp weather softened the frame so I would recommend spraying your salt dough project with a Clear Varnish to protect it.
And that is it, I did not use varnish or anything on it. The previous one is a year old, and still looks good, but to be on the safe side, rather varnish it. If you want to add a shiny look to it, you could add a glossy varnish. You can paint it afterwards, add glitter stones before baking or glitter flakes into the dough if you want a more sparkly keepsake.
Salt dough keepsake in the shape of a heart to be used as a photo frame! As an Amazon Associate and member of other affiliate programs, I earn from qualifying purchases.Handprint & Photo Heart Keepsake
Materials
Tools
Instructions
Recommended Products

Will you be making a hands and photo heart keepsake with your child/ren this year?
Perhaps you would like to see these keepsakes too:
Easter Handprint Keepsake
Earth Day Keepsake
Snow globe Fingerprint Keepsake
OR seen this pretty keepsake gift? Get the printable(and 5 more) HERE!


Nadia van Zyl says
Try this one: https://amzn.to/42JbJYr
Crystal says
Which varnish should we use please
Nadia van Zyl says
Yes, you shape it into a heart before baking
Kandace says
Hi! I’m curious if you need to shape the dough into a heart before baking? I don’t see that in your instructions?
Nadia van Zyl says
Just white glue;)
Randi says
How did you attach the cardboard and picture to the frame?
Nadia van Zyl says
Yes of course!
Maya Brown-Zimmerman says
Hi! My name is Maya Brown-Zimmerman, and I’m a staff writer for adoption.com. I’m creating a slideshow of valentine crafts that kids can make for their birth families, and I’d like to feature this keepsake. I would use a photo of the craft along with a brief description, and link it to your page. I would not provide instructions for the craft. Do I have your permission? Thank you!
~ Maya Brown-Zimmerman
Staff Storyteller, Adoption.com
Nadia van Zyl says
Let it lie face down overnight
Holly says
What do you mean by turn it around?
Helen Neale says
HI there, thanks for joining in with the Valentine Blog Hop linky – what a lovely, but really simple idea for Valentines. Can’t imagine why anyone wouldn’t like to get one of these!
Nadia van Zyl says
Regular is fine
Maria says
Does it matter if its cake flour, or can you use reg flour?
Nadia van Zyl says
Yes of course
Meagan says
Can I just cut the heart out with a knife instead of a cookie cutter?
Nadia van Zyl says
Make sure to bubble wrap it! Grandparents will love it!
Chloe says
I’m looking forward to making this with my daughter. We have never done salt dough before. I would like this to be Valentine’s day gifts for the grandparents two love out of state. Do you think these would be safe to ship of packaged right? Thanks! It’s such a cute idea.
cara says
Another one I found days to deal with modge podge…
Laura says
I recommend sealing it,made one for christmas and it molded.
Nadia van Zyl says
Perhaps one should varnish, just to be safe?
Nadia van Zyl says
No it did not crack or bubble. I did turn it around over night and left it in the oven to cool down and harden some more?
Michele says
I made a salt dough Santa handprint a couple years ago and the backside bubbled and cracked a bit after baking. Did your do this? Did you turn it over/upside down overnight when you switched the oven off? And did you never take it out until the next day? I’d LOVE to try this, so cute!
Nadia van Zyl says
Yes it will. You can air dry it, but will take longer.
Hill says
I want to do this with the kids in my church nursery, but wont be able to get to an oven until about 1 to 2 hours later. do you think the dough will hold the print until it can be baked?
Nadia van Zyl says
Thanks for the tip! Will definitely do that!
Verity says
At my nursery we seal salt dough by adding PVA glue to paint (half +half) if painting afterwards – this needs very thorough drying similar to drying the dough in a slightly warm oven or by a radiator; or with just PVA glue if the dough is precoloured like yours. It needs to be sealed both on the front and back of the dough, as moisture in the atmosphere (wherever the plaque is kept) will soften and eventually break any salt dough down if unsealed.
Steph says
That’s good info…. I think I will deal ours when I do this one!
mae says
I have a few I made with my 5 year old when she was first born and the one I made my mother I decided to seal it with spray paint Lol and out of the two it’s the only one that lasted. Mine unfortunately crumbled at year 3 🙁