Any Mario game lovers here? Make this Mario-inspired board game with the kids and have fun playing and learning at the same time!

This idea started with ice cream. I thought the lids on the new flake cones were quite peculiar and collected a few as I knew that sooner or later I will create something out of it. The more I looked at the lids, the more it made me think of mushrooms. The mushrooms, in turn, reminded me of the Super Mario game and the idea for a board game took hold.
The board

You will need:
- Hardboard 40x28cm
- Craft paint in light green, dark green, reddish-brown, blue
- Paper Number cut-outs
- Marker pen
- Masking Tape
- Modge Podge or clear varnish
What to do:
Paint the background in a medium shade of green. Draw a grid of 4x4cm squares to give a total of 70 squares.
Mask off some blocks and paint a shade of lighter green. Remove the tape, let the paint dry and mask off some other squares to paint in reddish-brown. Follow the same steps and paint a few squares in blue. (You don’t need to paint all the colours, but it does make it visually more interesting.) I choose the colours green, red and blue to represent the main colours in the Mario Game.
Define the lines again by using a black marker pen. Glue your letters by painting a thin layer of podge and sticking it to the board.
Once all the letters are stuck, give the whole board a good layer of podge or varnish, to seal.
Game Pieces
Mushrooms

You will need:
- Thin cardboard tube
- Plastic Ice-cream lids
- Bottle caps
- Newspaper
- Podge
- Glue
- Paint
What to do:
Cut the tube into lengths of about 5cm, some a little bit longer, some a little bit shorter. Glue the tubes into the hollow part of the ice-cream lid. A glue gun works best as you want the glue to set quickly. Paint a layer of podge over the mushrooms and cover with newspaper pieces.
Paint a layer of podge over the newspaper pieces. Start from the inside and make sure to cover the whole mushroom. Once the podge is completely dry, paint the mushrooms white. Let the white dry and paint the tops red, leaving some white spots. Paint the stems yellow.
Glue the stems of the mushrooms into the bottle caps. The bottle caps will give balance to the mushrooms once they are placed on the board.
Tubes
You will need:
- Cardboard tube (toilet roll or kitchen towel)
- Paint
- Green felt or cardboard
- Bottle cap to fit the roll
What to do:
Paint the rolls green, outside and inside. Cut the tube into different lengths. Cut 2cm strips of cardboard or felt and glue them around the top edge of the rolls.
Push the bottle cap through the tube to the bottom of the tube and flush with the roll.
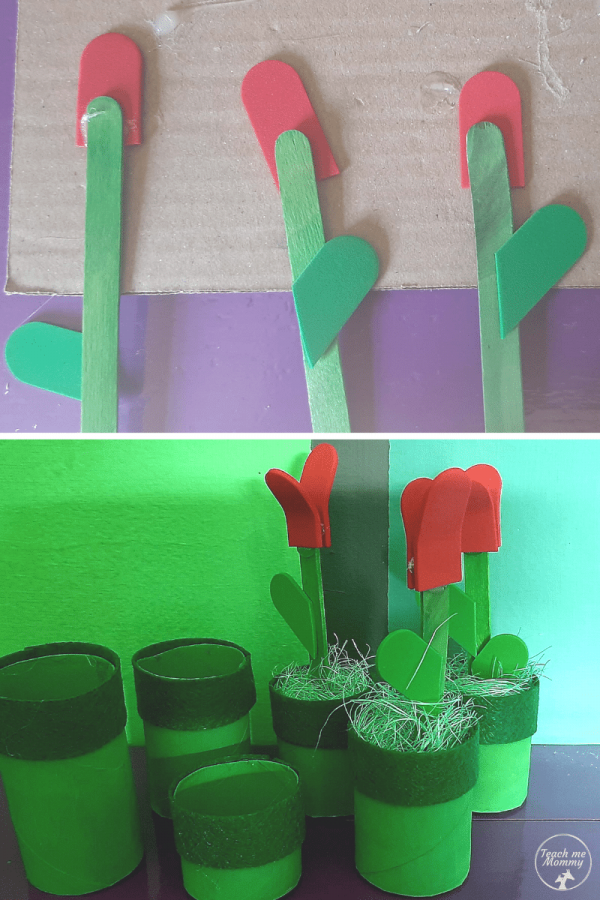
Plants
You will need:
- Green craft sticks
- Red and green foam sticks
- Glue
- Green sisal
What to do:
Cut the rounded part off the red foam stick (2 per plant). Cut the rounded part off the green foam stick at an angle to make a leaf shape. Glue to the craft stick using a glue gun. Bend the flower slightly to open the flower. Place the plants into the tubes, secure with sisal.
Flag and bricks

You will need:
- Small wooden blocks
- Round craft stick
- Paper
- Paint
What to do:
Paint the blocks a reddish-brown. Drill a small hole in the brick to be used as the flag. Insert the craft stick into the block and add a paper flag. Glue question marks to the rest of the bricks.
How to play the game
Place the flag piece on the last square (number 70).
Roll the dice, the player with the highest score chooses a game piece(any you have at hand, little men would be cute) and places it anywhere on the board. Players take turns until all the game pieces are placed. When I started this project the idea was to glue the pieces to the board, but my son suggested it would be more interesting if the landscape can be changed for every new game. If the pieces are a bit wobbly, secure with a small ball of sticky tack.
Roll the dice again, the player with the highest score starts. Play in the same manner as you will with Snakes and Ladders except instead of snakes and ladders follow these rules:
Land on Mushroom – Move an extra two spaces forward. Land in Tube – Move two spaces backward. Land on Tube with plant – Miss a turn. Land on a question mark – Earn another roll of the dice.
You can make up your own rules or change rules in between games to make it more interesting and fun.
The first player to reach the flag wins the game!

Such a fun DIY Mario-inspired board game to make with the kids!


Leave a Reply
You must be logged in to post a comment.